Hocus Pocus Embroidery Design: A Stitch Test Review
When I first unzipped the folder and saw the Hocus Pocus design preview, I wasn’t just looking at a file. I was already picturing a row of deep purple tote bags lined up for my booth at the fall craft market. The kind of bag that makes someone stop, smile, and immediately understand the playful, slightly spooky mood. That’s what a strong Halloween embroidery design should do—it should feel like a finished product before you even thread the needle. And this one, with its curvy lettering and witchy vibe, got my attention right away.
I’ve tested hundreds of machine embroidery design files over the years, and I’ve learned that the difference between a design that sells and one that sits unused is almost never about how it looks on a screen. It’s about how it behaves on fabric, how it reads from three feet away, and whether it makes sense for the kind of handmade products people actually buy. So I approached Hocus Pocus the same way I would any design meant for a real embroidery project—with a mix of curiosity and practical skepticism.
First Impression: The Mood Is Immediate
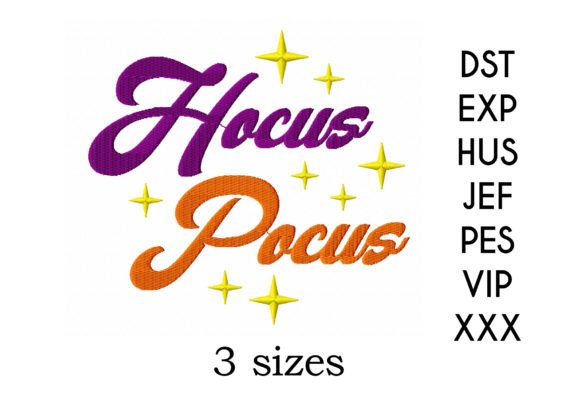
Opening the mockup, I felt that familiar flicker of “this could work.” The design leans into a playful, almost vintage Halloween aesthetic. It’s not horror-heavy or overly cute. Instead, it walks a line that feels surprisingly versatile. I could see it on a kid’s sweatshirt, sure, but I could also imagine it on a set of linen pillow covers for a home decor collection. The lettering has a swooping, slightly mischievous personality, and the layout is compact enough to fit a standard hoop without feeling cramped. Right away, I knew this wasn’t a design that would demand a giant embroidery field or a specialty machine—good news for crafters working with a mid-range setup.
Still, a preview is just a promise. I’ve been burned by designs that look crisp in the PNG but turn into a dense, puckered mess once the needle starts moving. So I loaded the embroidery file into my software and started planning a real-life test.
Real-Life Scenario: The Market Tote That Almost Wasn’t
Let me walk you through the exact project I had in mind. I’m preparing a small batch of handmade product goods for a local Halloween market. The crowd is mostly families, young couples, and people hunting for unique, not-too-scary seasonal decor. My plan was to stitch Hocus Pocus onto a 12-ounce cotton canvas tote in a rich plum color. I wanted a tote bag design that felt intentional, like a curated find from a boutique—not a generic iron-on.
I hooped a medium-weight cutaway stabilizer, floated the tote because I hate embroidering through seams, and queued up the design. The first thing I noticed was the stitch order. The outline started with the main lettering, which gave me a good sense of placement right away. The fill stitches that followed didn’t shift the fabric, and the satin border wrapped everything cleanly. I used a 40-weight polyester thread in a bright, almost neon green for the main text, with a charcoal gray for the accents. The contrast popped exactly the way I hoped.
When the machine finished and I unhooped the bag, I turned it toward the light. The letters read clearly. The small decorative elements—tiny stars or sparkles, I think—were distinct but not fragile. That’s a big deal for me. Many Halloween designs pack in too many tiny details that get lost in the fabric texture or, worse, turn into a tangled mess after a few washes. Hocus Pocus kept its clarity without sacrificing charm.
How the Design Actually Stitches
If you’re a craft business owner or an Etsy seller, you know that stitch density can make or break your production time. Heavy designs chew through thread, slow down your machine, and can feel stiff on wearables. This one struck a nice balance. The fill areas were solid but not bulletproof. I wouldn’t call it a lightweight design, but it’s not a thread-eater either. I’d guess it’s around medium density, which works well for custom apparel, tote bag design, and sweatshirt embroidery projects.
I tested a second stitch-out on a pre-washed cotton-blend sweatshirt. Here, I used a no-show mesh stabilizer because I wanted the back of the embroidery to feel soft against the skin. The design handled the slight stretch of the fabric perfectly. No puckering, no misaligned satin edges. I did notice that the very ends of the curvy letters—those little flourishes—require a crisp machine. If your needle is dull or your tension is off, those fine points might blur. But that’s true for any embroidery design with delicate details. A fresh needle and a test stitch on scrap fabric is always my first rule.
Where Hocus Pocus Really Shines
I found myself mentally placing this design on product after product. It’s tailor-made for holiday embroidery that doesn’t scream “one-season-only.” A few of my favorite test placements:
- On a black apron for a baker who loves a little witchy flair in the kitchen.
- Stitched onto a heavyweight pillow cover with a metallic gold thread—instant mood for a cozy reading nook.
- Applied to a simple baby embroidery bodysuit, paired with a tiny star motif, for a spooky-but-sweet newborn gift.
- As a pocket-sized embroidered patch on a denim jacket, giving it a subtle, personal touch.
- On a set of tea towels for a hostess gift that feels thoughtful, not mass-produced.
In every case, the design’s personality carried through. It didn’t feel like a random graphic slapped onto a product. It felt like it belonged there. That’s the difference between a generic digital embroidery file and one that can build a small shop product line.
Watch Points: Where You Need to Be Careful
No design is perfect for every scenario. I’ve learned to be honest about where a design struggles, and Hocus Pocus has a few things you should watch.
First, small hoop sizes. The product description notes it comes with multiple embroidery formats, but you’ll need to confirm the maximum hoop size required. If you’re trying to squeeze this into a 4x4 inch hoop, you might lose the delicate spacing between letters. I recommend a 5x7 inch hoop minimum for the full effect. Always check the dimensions before buying if you only have a small field.
Second, highly textured fabrics like terry cloth or fleece can swallow the finer details. I tested a quick stitch on a fluffy throw blanket and the tiny star-like accents nearly disappeared. If you’re going to use it on something napped, consider a water-soluble topper to keep the top stitching crisp.
Dark fabrics need a careful eye for thread color contrast. The design’s mood is naturally a bit shadowy, so if you choose a dark thread on a dark background, the whole thing fades into a blur. I always test color combos on a scrap of the exact fabric first. For a sweatshirt embroidery in charcoal, I’d go with a lighter, glowing thread—maybe a heathered orange or a bright violet—to get that pop.
One more caution: if you plan to use this on a cap or a curved surface, the lettering could distort. The arc of the text might not align perfectly with the curve of a hat. I’d test it on a flat cap before committing to a batch. It’s doable, but you’ll need to adjust the placement carefully.
Commercial and Creative Use: What’s the Real Value?
For small business owners, Etsy sellers, and apparel decorators, a design is only as valuable as the products it helps sell. Hocus Pocus has a rare quality: it’s recognizable but not overused. It still feels fresh, which is hard to find in the Halloween niche. I can see it working beautifully for personalized gift orders, like a tote bag with a name added beneath the design, or a onesie for a baby’s first Halloween.
If you sell digital embroidery file collections or printable mockup previews, this design is a strong candidate for your preview images. It photographs well because the lines are clean and the theme is clear. Customers understand it instantly, and that reduces hesitation before a purchase.
Before you use Hocus Pocus for any commercial products, though, double-check the licensing. The product description is brief, so I’d reach out to the designer to confirm whether you can sell finished items made with this design. Many designers allow it, but some restrict commercial use or require credit. Getting that clarity upfront protects your craft business from any issues down the line.
Designer-to-Designer Notes
If you’re an embroidery designer yourself, you’ll appreciate the way the satin stitch borders are angled. They guide the eye along the text without creating harsh, boxy outlines. The fill stitch direction is consistent, which means the light hits the thread evenly and reduces that shiny-patchy look some designs have. I’d recommend using a high-quality polyester thread for a slight sheen, or cotton thread if you want a more matte, vintage feel.
When testing, I always run the design through a black and white mockup to see if the contrast holds. Hocus Pocus passed that test. Even without color, the letter shapes remained readable. That’s a sign of good digitizing—the design depends on shape, not just color, to communicate.
For anyone using this as part of a larger embroidery project collection, I’d pair it with matching star motifs or a simple crescent moon. It stands alone, but it also plays well with complementary designs. That flexibility is valuable if you’re building a themed product line.
Final Thoughts Before You Stitch
Every time I test a new machine embroidery design, I’m really asking one question: would I put this on a product I’d sell to a stranger? With Hocus Pocus, the answer is yes—with confidence. It’s not just a cute seasonal graphic. It’s a design that feels intentional, well-digitized, and adaptable. The witchy, playful mood is there, but it’s gentle enough to live on a baby blanket or a kitchen towel without feeling out of place.
I’d recommend it especially to makers who want to create finished product lines for autumn markets, online shops, or custom gift orders. Just remember your stabilizer, test on scrap fabric, and play with thread colors until the magic really shows. Because that’s what this design is—a little bit of magic, ready to be stitched into something real.